Introduction
This is the practical team assignment for the course Interaction Prototyping. The practical course is taught at the Institute of Ergonomics of the Technische Universität München in the context of master courses in Human Factors Engineering, Mechanical Engineering, and Computer Sciences in the
. This document is authored by Antonia Conti, Barbara Gleissl, Bastiaan Petermeijer, Markus Zimmermann, Yucheng Yang and Lorenz Prasch. It is optimized for being printed in Chrome.
 Interaction Prototyping is licensed under a Creative Commons Attribution 4.0 International License.
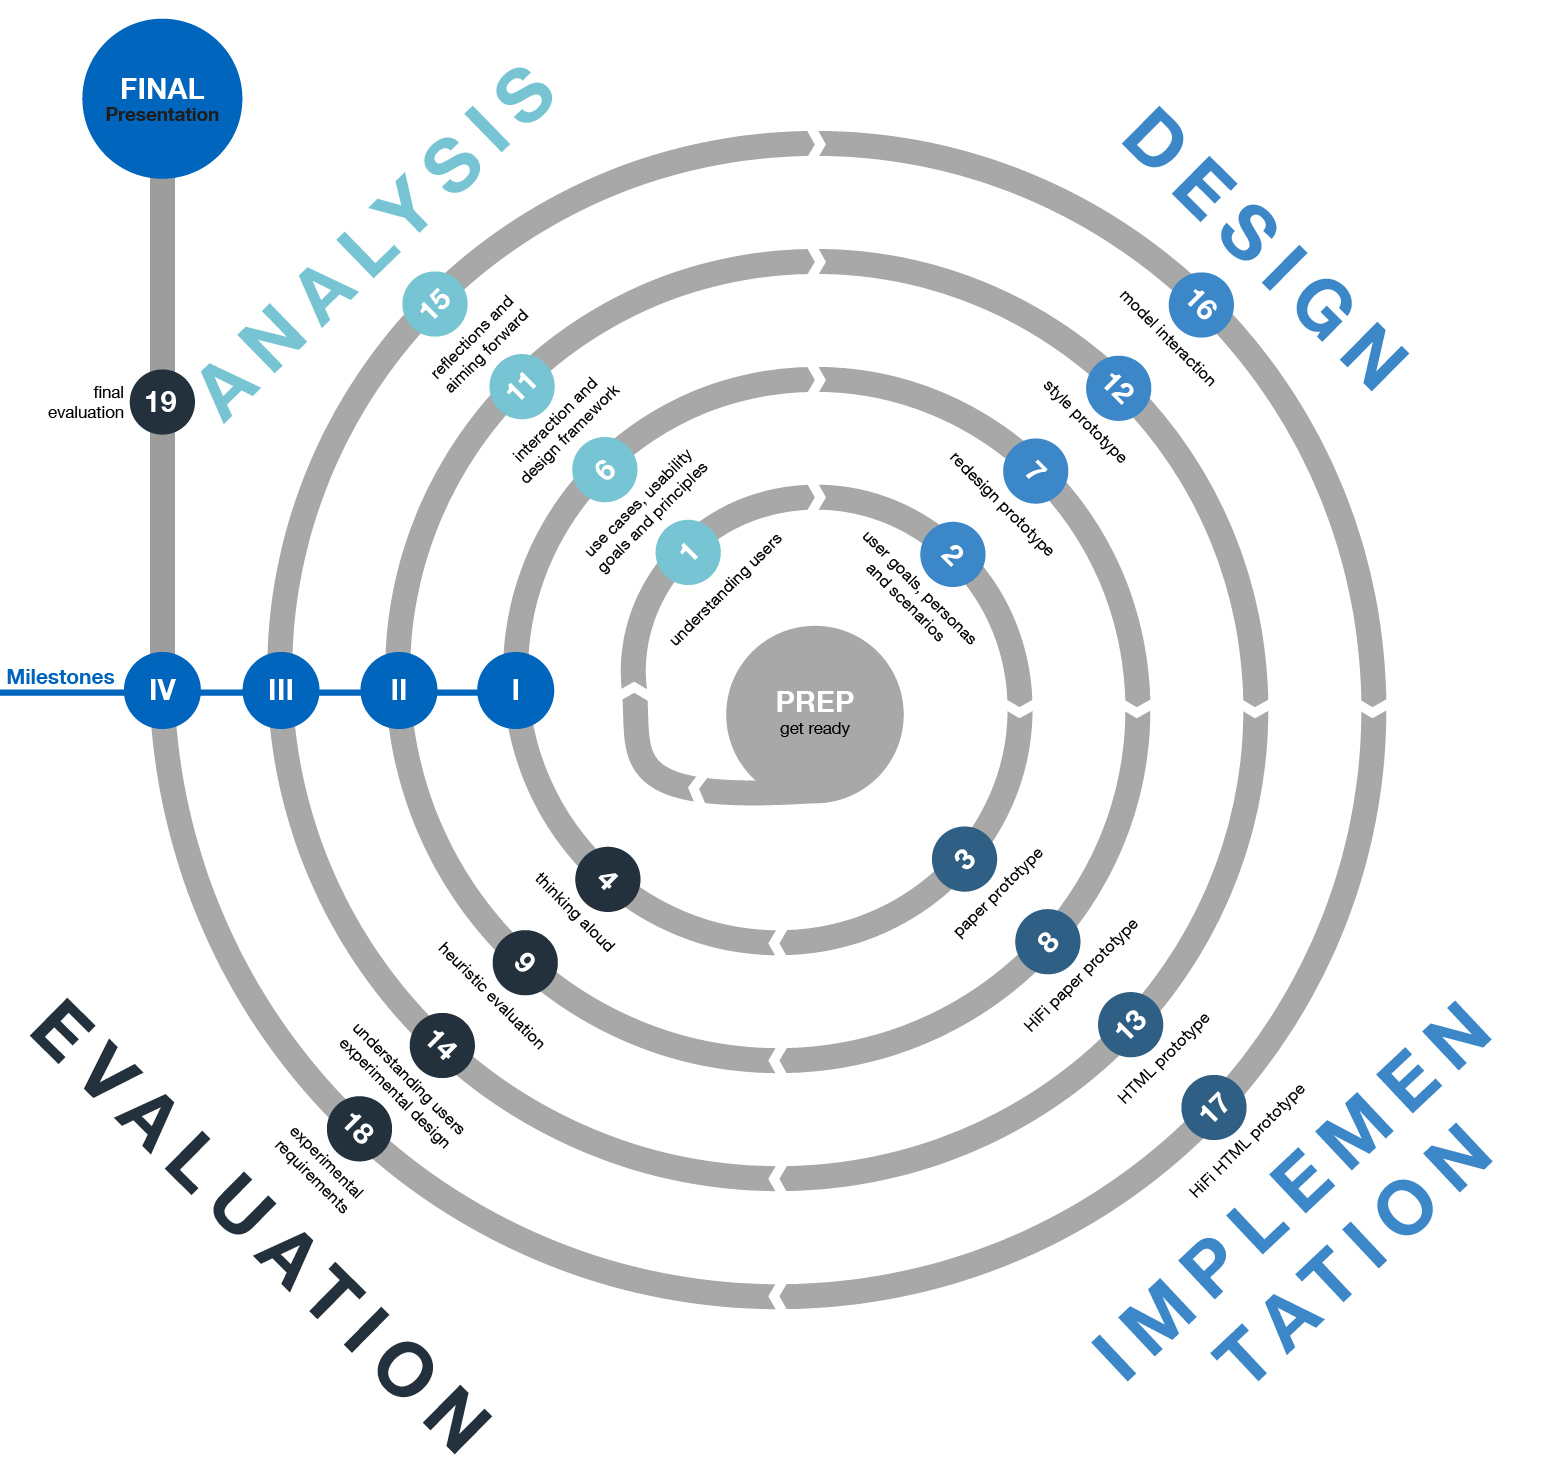
The team project aims to freely design and prototype an interactive mobile application in HTML/CSS/JavaScript. You will work in five iterations (with corresponding milestones). Throughout each iteration, you will follow the user-centered design process. This design process includes analysis, design, implementation and evaluation.
Prototype functionalities will be freely and independently designed by your team, depending on your creativity in brainstorming, the gathered user and usability requirements, as well as your use cases and scenarios. The user will be able to perform interactions, for example: buying, listing, viewing, informing, playing, searching.
Note: The course focuses on interaction prototyping. Even if your required/specified feature is not fully functional, you can simulate it and work on evaluating the corresponding user interface.
General information on the practical course:
- All the tasks during this project phase will be group exercises (groups of persons). We recommend that every team member practices and contributes to the implementation part of the exercises. Establish interdisciplinary teams for working on your prototype. Find a name four your group.
- Each of the five iterations is planned for a duration of two weeks. Please ensure that you have pushed solutions for all exercises to GitHub at the end of the iteration. Your repository will be https://github.com/interactionprototyping/GROUP, where GROUP is your group's chosen name. Set up a suitable file and folder structure; please indicate in the README.md, where your current version of your prototype can be found.
- Document your implementational and methodological progress/process throughout the whole project in a brief, but suitable manner (beginning at the first iteration) on GitHub. This documentation will be taken into account for your final grade and will simplify the final project presentation, as you have already structured your results. By using the history functionality of GitHub, you may furthermore return to earlier versions of your prototype.
Schedule
03.09.2018
Start of the Interaction Programming: Block Course
The course material is available via https://www.edx.org/course/make-your-own-app
- 15.10.19 14:00-16:00: Lecture 1 / team assignment / get ready
- 22.10.19 14:00-16:00: Discussion of ideas
- 29.10.19 14:00-16:00: Lecture 2
- 05.11.19 14:00-16:00: Deadline iteration 1 + milestone presentation I
- 12.11.19 14:00-16:00: Free
- 19.11.19 14:00-16:00: Deadline iteration 2 + milestone presentation II
- 26.11.19 14:00-16:00: Lecture 3
- 03.12.19 14:00-16:00: Free
- 10.12.19 14:00-16:00: Deadline iteration 3 + milestone presentation III
- 17.12.19 14:00-16:00: Lecture 4
- 24.12.19 14:00-16:00: Free
- 31.12.19 14:00-16:00: Free
- 07.01.20 14:00-16:00: Guest lecture
- 14.01.20 14:00-16:00: Deadline iteration 4: milestone presentation IV
- 21.01.20 23:59:59 Freeze of GitHub: finalization of prototype
- 28.01.20 14:00-16:00: Questions & answers
- 04.02.20 14:00-16:00: Deadline final evaluation + final presentation

Expectations, requirements, and grading:
Your final grade will consist of a methodology (50%, documentation and final presentation) and an audit of your prototype (50%, ergonomics and HTML)
The methods part (documentation and final presentation) depicts your correct application of appropriate usability engineering methods. Do not only apply methods that have been presented or mentioned in class, rather read on and involve other methods you know or have read about. There are not “correct” or “incorrect” methods, so document the reasons for selecting or disregarding specific ones (both in your milestone and poster presentations). Document the results and insights they provided. The maximum credits can be reached based on the following expectations (in descending importance):
- Methodology
- The prototyping process is performed using a very structured approach. The choice of usability and user centered design methods are clearly motivated and correctly applied. More than the given methods were used. Iterations of the process phases are clearly visible.
- Results
- The selected evaluation outcomes are important and presented in a structured and clear way. The outcome of the evaluation is linked to concrete design improvements of the prototype. The results are discussed using the usability requirements as well as other appropriate criteria. Both evaluation outcomes as well as the implications for your prototype are critically discussed.
- Creativity
- The developed prototype is innovative and original.
- References
- The design and methodology choices are supported using literature (i.e. correct sources of the methods that have been applied), appropriate guidelines, design rules, or design patterns.
- Tools
- Various and multiple modeling/prototyping tools (paper, software) are used. The different provided tools are used appropriately.
The prototyping part (i.e. the code audit) of your grade will consist of the assessed functionality and interactive behavior of your prototype. The maximum credits can be reached based on the following expectations (in descending importance):
- Usability
- The prototype follows (not only the established) usability, readability and clarity rules (heuristics, patterns and guidelines). No usability bugs are present and found in the code audit.
- Techniques
- There is a very clean HTML structure. CSS is used accurately. The app stays on one page. The prototype relies heavily on JS and jQuery or other JS frameworks. Data is stored in objects. Interface components or APIs are used. Code is structured, reused and commented.
- Functionality
- Basic established use-cases (e.g., in case of a music app, playing any song in the library, or compiling arbitrary playlists) are functional.
- Level of Detail
- The created interaction allows a high (horizontal or vertical) capability. More than the tested experimental paths are implemented. "Experiencing" the app is possible in all program sections.
Get Ready
Brainstorm ideas for an interactive mobile application
An exemplary procedure might be:
Make a Mind Map of ideas for an interactive mobile application. By interactive, stress is on the interaction between the application and the user, rather than on the application functionality. Think of new and innovative ways how a mobile application can be used, write these down and create a Mind Map. Either make a hand drawn (take a photo) or a software based (see below) Mind Map.
The primary objective of this mind mapping process is to come up with a application prototype that has both features and functionality. More information regarding features and functionality can be found in Section 2.1 of Nielsen's Guerrilla HCI . As you will see, features are referred to as the horizontal component of prototyping and functionality is the vertical component. The goal of this course is for you to have a broad understanding of the horizontal features (viz. interaction) and to, by the end of the course, have implemented a limited set of the vertical functionality (also, interaction).
Generate ideas and select the best ones
According to the creative problem solving process (and general brainstorming rules), strictly separate the two phases convergent (idea generation) and divergent (idea evaluation) thinking. Divergent thinking means a "broad search for many diverse and novel alternatives". Convergent thinking means a "focused and affirmative evaluation of alternatives". Separating those phases ensures, that you explore the topic broadly, consider all relevant factors, and find new alternatives.
Basic rules for divergent thinking are:
- Defer judgement.
- Avoid any form (positive or negative), even thought, and defer to convergent phase.
- Strive for quantity.
- Generate many options to get the chance of finding good options. Whether an option is good or bad is judgment and therefore deferred.
- Seek wild ideas.
- “Wild and crazy” or “childish” ideas have great potential, even if it’s easier to develop than to implement!
- Make connections / build on other ideas.
- Combine and further develop existing elements, as thoughts are springboards for creating alternatives.
Basic rules for convergent thinking are:
- Apply affirmative judgment.
- Search for value instead of problems, this creates a positive attitude towards new (never perfect) ideas and their realization.
- Be deliberate.
- Dedicate time to judging option, consider options and check against criteria.
- Check your objectives.
- Options are answers to a question, always check the original question and whether or not an idea is on target.
- Keep novelty alive.
- New options are created also because existing solutions are not satisfactory, so always consider the novelty of an option.
- Improve ideas.
- An idea is a seed that needs time and care. Keep in mind to develop them further.
Apply creativity techniques or creative thought processes for both divergent (e.g. brainstorming, ...) and convergent (e.g. telescoping, COCD Box, ...) phases (a good summarizing book is "Denkwerkzeuge der Kreativität und Innovation" by Florian Rustler). Useful tools are post-its and glue dots.
Mind mapping
Mind mapping is a technique that can assist the process and document the results of a brain storm session. Read the mind mapping introduction on wikihow, which gives you a short description of the basics of the mind mapping technique. The website "How to Make a Mind Map" on mind-mapping.co.uk goes into more detail on how to improve your mind map using color, keywords and images.
Software
FreeMind is free software writen in Java, which can be used to to create a min map. It can be freely downloaded.
Detailed description of three ideas
Provided a more detailed description of three ideas that came up in the brainstorm. Describe the goal, functionality, and target group of the application. After considering all three options, pick a favourite one that you would like to develop further.
Prepare a short Powerpoint of your different ideas for the next session.
Join Mendeley and the Interaction Prototyping group
The literature presented in class and used in these exercises is available in the Mendeley Interaction Prototyping group, which you should join. There is a desktop client of Mendeley.
 Many of the papers and books are available online (inside the university network). Please set up your TUM university library's proxy.
Join GitHub and your team repository
Choose a group name for your team. Each team member needs to set up a GitHub environment:
- Create free GitHub account
- Send your GitHub user names and your group's chosen name to Yucheng Yang
- You will be given access to the repository https://github.com/interactionprototyping/GROUP, where GROUP is your chosen name.
- Download and install the Windows or Mac client.
- Clone the
gh-pagesbranch of your repository. Find instructions on this below.
GitHub benefits
GitHub is an online cloud service (online storage) which simplifies collaboration in IT projects. It is based on the software Git. The combination provides tools for solving conflicted versions of a file, merging different edits in the same document and backing up your project.
The benefits of GitHub are threefold:
- Version control (all code revisions are stored, you can jump back)
- Collaboration (your team can work together on the code)
- Cloud (your app is stored in the internet and can be accessed via smartphones)
Stages and commands of GitHub
Git is separated into four levels: workspace/ working directory, index, local repository, and online repository. The Git commands allow to organize these four levels to realize the high functionality of Git. A few important commands are explained in the following graphic.

Workspaces, branches, index, history, repository
The following list briefly explains the concepts. Items marked with * are the levels, we're going to work with during the course.
- Workspace*
- The workspace is the actual folder on your computer, within you make your modifications.
- History*
- With the history function of Git and GitHub, it is possible to revert a single commit in the past or to roll back the whole project to a selected point.
- Local & Online Repository*
- These repositories are the “containers“, where your project is stored. After all synchronisation, both repositories, online and offline, are all the same.
- Branches
- Working with branches allows to test different versions of one commit. If you are not sure, which possibility might be the best one, you simply set up another branch und implement both versions at the same time. After you made your choice, you have the possibility to merge the commits from the two branches. In order to access your HTML/CSS/JS prototype directly as a www app (contrary to inspecting the code in the www), you need to use the branch
gh-pages. - Index
- As kind of a meta-level, the index isn‘t directly visible or editable. Before commiting your modifications, GitHub creates this index, which will be posted to your local repository.
Git commands
The following basic commands are necessary:
- Commit
- Commit a file to bring it under versioning control (you can later revert to this revision or compare differences)
- Push
- Push a file to bring it online (available for other team members)
- Checkout
- Checkout of a file brings it back to your workspace in a certain version (available for inspection and modification)
- Pull
- Pull a file to bring it from the online repository to your local workspace.
Advanced GitHub commands
When using the GitHub GUI, you will find several buttons, which are not classic Git commands. These buttons often unite a few commands to one action that performs a special and necessary task. Again, items marked with * are the levels, we're most likely going to work with during the course.
- Sync*
- The snyc action unites the commands add, commit, push, fetch and checkout. By syncing your local repository, you do load the latest version of the online repo while updating the online version with your commits.
- Revert*
- The revert action creates a new commit that reverts all changes up to the selected commit (this means, the revert is also revertable).
- Roll-back
- The roll-back action reverts all changes that were committed after the selected commit. This is not reversible!
The GitHub client - a graphical user interface for Git
After installing and logging in to GitHub, you are ready to work with the Windows/Mac Client of GitHub. To advance the usability of working with Git as online cloud memory with several addons, you usually won’t need any commands in this GUI. Below you‘ll find some views of the GitHub GUI in different modes. Start by cloning (press the ![]() icon) your group’s online repository and choose a folder, where you want your local workspace to be.
icon) your group’s online repository and choose a folder, where you want your local workspace to be.
You’ll now find your local repository overview in the left menu:
This shelters all the additional functionalities, which GitHub provides. For example, you can now start editing the files in your working directory. Therefore right-click the repository and select Open in Explorer. There you can add files or edit the existing ones.
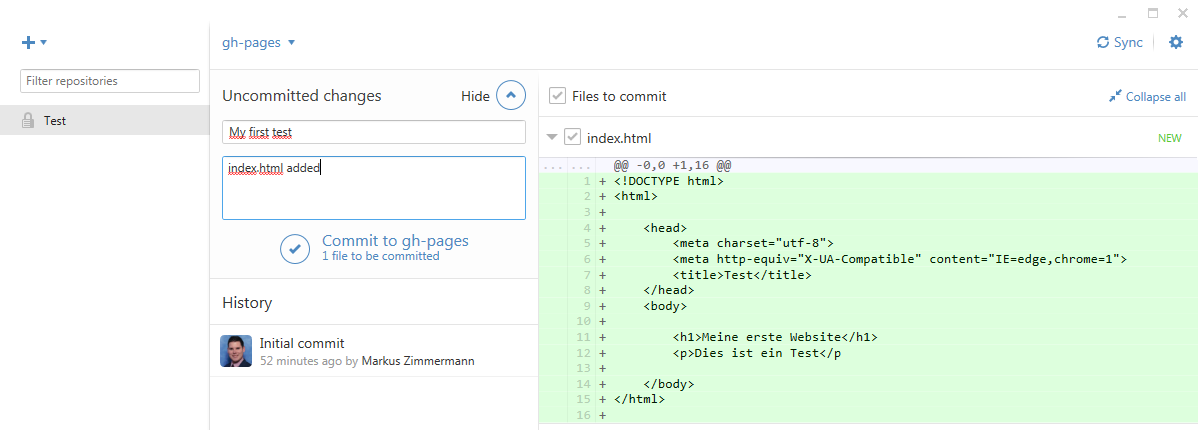
Whenever a file is modified, you can create a commit (“snapshot” of your current project state). The GitHub client recognizes and summarizes the changes in the area "uncommitted changes", in the right area you will see all the changes in the files (and their differing content):
You simply need to enter some text which describes your modifications (important for your teammates, e.g. “Functionality X improved” or “Bug Y fixed”) and press the commit button: ![]()
Before your edit appears online, you also need to push your changes from your local repository to the online repository. Instead of pushing/pulling, GitHub offers a synchronization of the online and local repositories. Simply press the corresponding button: ![]()
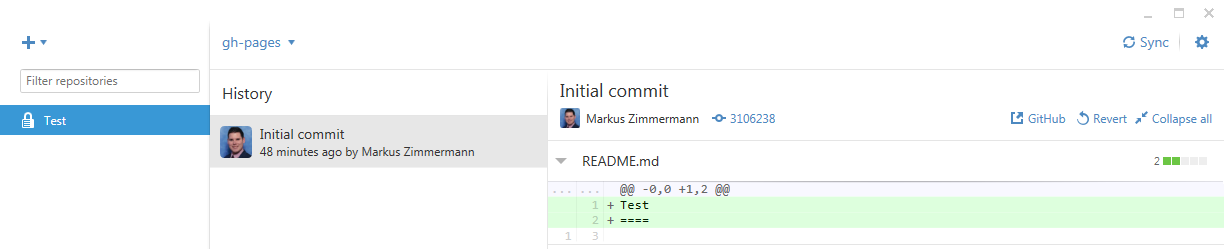
You can explore the different revisions (or “snapshots”) by clicking the different commits in your history. There you get a view of the differences (added/removed code for each file) and the possibility of reverting changes:
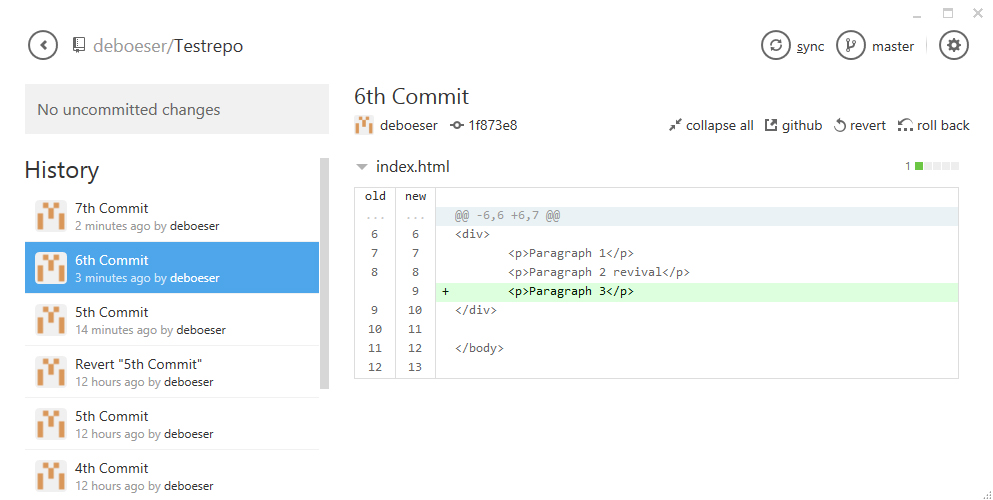
Imagine you made a commit in the past and later on in your project you realize: this was not, what you wanted to do. Git simply gives you the possibility, to revert a single commit in the past: Select the commit, you want to revert (in the history). Press the ![]() button (this is only possible, if all pending changes where committed), you now have to commit/sync the revert.
button (this is only possible, if all pending changes where committed), you now have to commit/sync the revert.
If two (or more) persons modified a file simultaneously, this will result in a conflict which you need to resolve by merging. Github will amend the conflicting file with conflict markers: The marker for a starting conflict is<<<<<<<, while the end of the conflict is marked with >>>>>>>. The two versions are separated by =======. Open the conflicting document with an editor of your choice (e.g. Brackets) and resolve the conflict by deleting the unwanted version and the markers. A file could look like this:
<<<<<<< HEAD
Here is your change
=======
Here is another conflicting change
>>>>>>> origin/gh-pages
Once you resolved the conflict, commit the merged file (don't forget to select it by clicking ![]() in the "Files to commit" area).
in the "Files to commit" area).
The branches
There is a concept called “branches” in GitHub, those are used for allowing a parallel workflow of multiple application versions in big software projects. Basically, one would create a copy of the existing application (create a branch), improve the functionality (without altering the main project branch, called the master branch), and once the functionality is there, discuss it and finally merge it to the master branch.
For the interaction prototyping course, it’s sufficient if you stay in the master branch (for private documents like tests, presentations, evaluation, …) or in the gh-pages branch (for the development of your application, which then will be publically available in the internet). Keep in mind: the latter branch is publically available in the internet. You need to select the appropriate branch in the top bar of your GitHub client: ![]() .
.
Ready, steady, go!
Find further information by reading the GitHub tutorials. Create an arbitrary HTML document in your cloned repository. Provoke a conflict: multiple authors are editing this HTML document and synchronizing changes. Try to resolve the conflicts by merging the edits. Try to revert to an earlier version.
Discuss with your tutors: What is a commit, a synchronization, and a branch?
Set up the development environment
The device
Get one phone (Nexus 5X) per team: for collecting it in room MW3304 (Lorenz Prasch), bring your ID card or passport. One team member needs to sign the lending and will be responsible for the phone until return at the end of the semester.
The environment
Set up an environment for creating HTML documents on your computer.
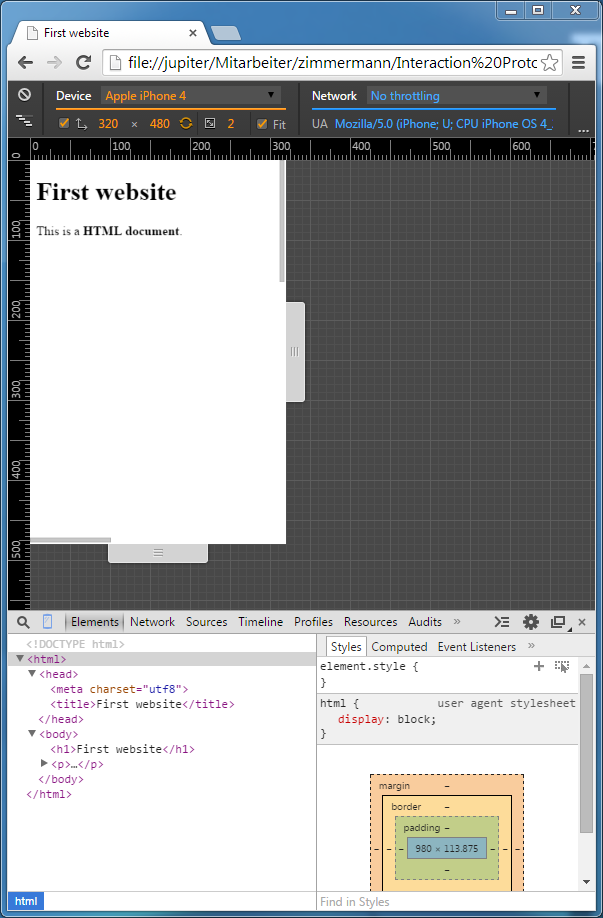
Create a HTML page (e.g. the HTML skeleton in the slides) with some elements (headline, paragraphs …) and open it in your browser (a description of this procedure is available on w3schools).
Access the Chrome developer tools and inspect the elements in your document. Activate the device emulation (Nexus 5s):
Starting the app
You can now make your HTML accessible via github.io, a web server publishing all documents you have in the GitHub branch gh-pages.
- Go to your project repository: https://github.com/interactionprototyping/GROUP (where GROUP is your group's chosen name)
- Create a
gh-pagesbranch, which is used to publish your site: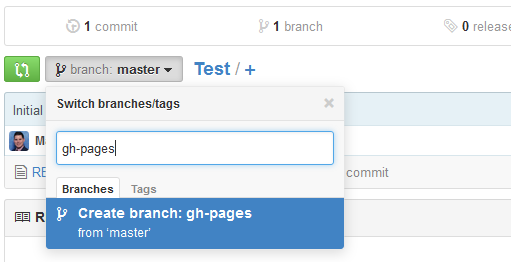
- Make
gh-pagesyour default branch (go to , right side):
- The files, you commit to this branch, are published under http://interactionprototyping.github.io/GROUP/FILE.html (where GROUP is your group name and FILE the filename of the document you committed). Convention: If you name your application’s starting page
index.html, you don’t need to enter a filename in your browser: typing http://interactionprototyping.github.io/GROUP will then be enough. - You can access these files in your phone’s browser. Wait five minutes for the first usage after setting up
gh-pages.
You can use the campus Wi-Fi by setting up eduroam!
First Iteration
Understanding the users: Qualitative analysis
Before you get started, take the time to get to know your users. Use a qualitative research method or a combination of methods of your choosing with at least 5 participants to better understand your target group. Some ideas (to which you are, however, not limited) include:
- A (structured) interview with your participants to find out about their wishes, and ideas as well as potential problems, features, etc. You could also draw inspiration from Microsoft’s Inclusive Design Toolkit.
- A thinking aloud experiment (Nielsen, 1994) or contextual inquiry, if a similar application already exists.
- A diary study over the course of a few days, in order to obtain longitudinal data.
Summarize the results of your analysis (not more than 1 page) in a folder iteration-1/user-research in the GitHub master branch.
Design: User goals and personas and scenarios
Read chapter 5 in Cooper (2007): About Face 3 (full text accessible via Safari Books).
User Goals and Personas
Create 3 personas based on your contextual inquiry or interview. Read this guide provided by the U.S. Department of Health & Human Services on the develpment process and elements of personas.
Specify user goals linking the personas you created and the information from your contextual inquiry or interview. The goals of the personas are a tool to derive the functionality that is expected of the application. The functionalities should fullfill the users' goals. Focus for this practical course on the experience and end goals of the user.
You can also familiarize yourselves with the Jobs-To-Be-Done framework, a relatively new technique that focuses on user needs. This approach has grown in prominence in recent years, and can be used complimentary or as an alternative to personas.
Scenarios
Read chapter 6 on scenarios in Cooper (2007): About Face 3. Write user scenarios (narrative) in which the personas use your mobile app. Use the personas to come up with scenarios in which the app is utilized.
Document your personas and scenarios (e.g. in .ppt) in a folder iteration-1/design in the GitHub master branch.
Implementation: Early stage prototype
Using Nielsen's (2012) Usability 101, create sketched early stage vertical prototypes on paper of (more than five) different views of your interactive application that address your analysis and design stages.
Upload your screen images to a folder iteration-1/prototype in the GitHub master branch.
Evaluation: Thinking aloud
Run a thinking aloud experiment, as per Nielsen’s (1994) paradigm Discount Usability Engineering (a small group of 2-5 persons is sufficient). An important rule is established in Pereyra's (2015), principle 10: "Don't grade your own homework" in 10 steps to engaging user experience: involve users as subjects, you’ve not asked yet! Record the evaluation in a suitable manner and discuss usability issues and possible improvements.
Upload a short usability report including your conclusions (not more than 1 page) to a folder iteration-1/thinking-aloud in the GitHub master branch.
Milestone Presentation I
You will demonstrate your methodological findings and your early stage prototypes during the next Interaction Prototyping session. Prepare a 10 minute presentation on your approach and the corresponding results, covering all the work done in the first iteration.
Don’t necessarily proceed task-by-task, but rather tell a methodological story (why you chose certain methods, techniques or tools). Demonstrate the work in progress and formulate questions to debate with the experts in the plenary during a 10 minute discussion.
Upload your presentation (.ppt or .pdf) to a folder iteration-1/presentation on the GitHub master branch.
Second Iteration
Analysis: Use cases, usability goals, and principles
Use cases (UML)
Specify your application functional requirements based on your personas and goals in a formal way. Use UML Use Case Diagrams (see Chapter 2 Miles, 2006) to describe the functional requirements of your application (e.g., buying, listening, rating, searching).
Consider paths from starting the app until performing a certain action/goal (for example, in case of a music application, listening to a specific track). Consider deviations from that path (like, for a music application, "music not found", "music not offline available", or "song preview").
Ensure that the requirements match different application functionalities (e.g. media library, media store, playback functionalities). These are of course dependent on the original idea of the app.
Use a graphic tools of your choice or an online tool like Creately (register for saving or take a screen shot)
Document (e.g. in .ppt) your UML use-cases in a folder iteration-2/Analysis in the GitHub master branch.
Usability requirement and goals
Use your scenarios to create usability requirements and goals.The functional requirements you have already defined in the UML use cases. Check if these requirements are fullfilled with your current prototype. Feel free to adjust your requirements if needed. Note that, usability goals are user oriented and operationally defined (see Analysis lecture slides for more details; see Cooper (2007): About Face 3).
Principles
Search familiarize yourself with a set of suitable design principles (see slides) that reflect the usabilty requirements and goals you specified above. Do not just (or worse: define as not applicable) the buzz-phrased principles, rather read them (and their sub-categories) in detail:
- Chapter eight ("Synthesizing Good Design: Principles and Patterns") in Cooper's (2007) About Face 3
- Nielsen's 10 Usability Heuristics for User Interface Design, which are detailed in chapter five ("Usability Heuristics") in Nielsen's (1993) Usability Engineering
- Shneiderman's eight golden rules of interface design (chapter 2.3), in Shneiderman, B., & Plaisant, C. (2010). Designing the user interface. Upper Saddle River, NJ: Addison-Wesley.
- Tognazzini's (2014) First Principles of Interaction Design (Revised & Expanded)
It is suggested to orientate yourself to the Nielsen's 10 Usability heuristics, and read other rules as information
Document (e.g. .ppt) your (new) requirements, usability goals and exemplify how the principles were accounted for and improvements needed in a folder iteration-2/analysis in the GitHub master branch. Discuss them with your tutors.
Design: Apply the analysis to your design
Apply your knowledge gained from analyzing UML, usability requirements and goals, as well as the principles: Put to the side your paper prototype from the first iteration and redraw it using what you have learned (e.g., principles).Do not fear fear - just do it; "the chance of you hitting the bulls eye with you first shot is very slim" (Pereyra, step 10). Also use the findings from your evaluation of the first iteration. To see why this is important, see paper prototyping according to the Nielson Norman Group.
Upload your screens iteration-2/design in the GitHub master branch.
Implementation: hi-fi paper prototype Deadline: 13.11.2019
Create a prototype with the software POP - Prototyping on Paper with more details and interactions based on the define functional requirment in the UML in Task 6 and the improved screens in Task 7.
This prototype will be regarded as the "hi-fi paper prototype", which includes most of the design features and interaction concepts of the app.
Upload your sharing URL of your POP prototype to a folder iteration-2/design in the GitHub master branch. Offer the POP prototype for your partner group (another team in this course) to conduct the Task 13.
Evaluation: Heuristic evaluation Deadline: 15.11.2019
Do a heuristic usability evaluation of the POP prototype from your your partner group (another team in this course) as experts using the template we provide. Again consider Nielsen’s (1994) paradigm Discount Usability Engineering, as well as Nielsen's collection of information on Heuristic Evaluations. Details can be found in Nielsen's (1993, chapter 5.11).
Download Template
Upload the evaluation report in a folder iteration-2/heuristic-evaluation in the GitHub master branch. Offer your evaluation and feedbacks to your partner group (another team in this course) to conduct the Task 14
Milestone Presentation II
Prepare a short presentation on your approach and the corresponding results in the second iteration, including reflections based on the evaluation result. You will demonstrate your methodological findings and your hi-fi paper prototype in 20 minutes (10 minutes presentation and 10 minutes discussion) Please ensure that your presentation does not exceed the alloted time!
Don’t necessarily proceed task-by-task, but rather tell a methodological story (why have you chosen certain methods, techniques or tools). Demonstrate the work in progress and formulate questions, you can discuss with the experts in the plenary.
Exchange the evaluation results between the evaluator and the evaluatee, upload your presentation (.ppt or .pdf) to a folder iteration-2/presentationon the GitHub master branch.
Third Iteration
Analysis: Interaction and design framework
Generally speaking there are two ways for you to determine the design language/framework you can use in your app. You can use a predefined styleguide or you can define your own style. Where both approaches have advantages and disadvantages alike, it is your task to make an educated choice and document it properly. The choice of framework/design language strongly influences the interaction patterns your app is going to employ. Inform yourself on Cooper's (2007) interaction framework (chapter 7) and design frameworks.
There are three best practices from which you may choose freely:
© Course Rating App, IPP WS16/17
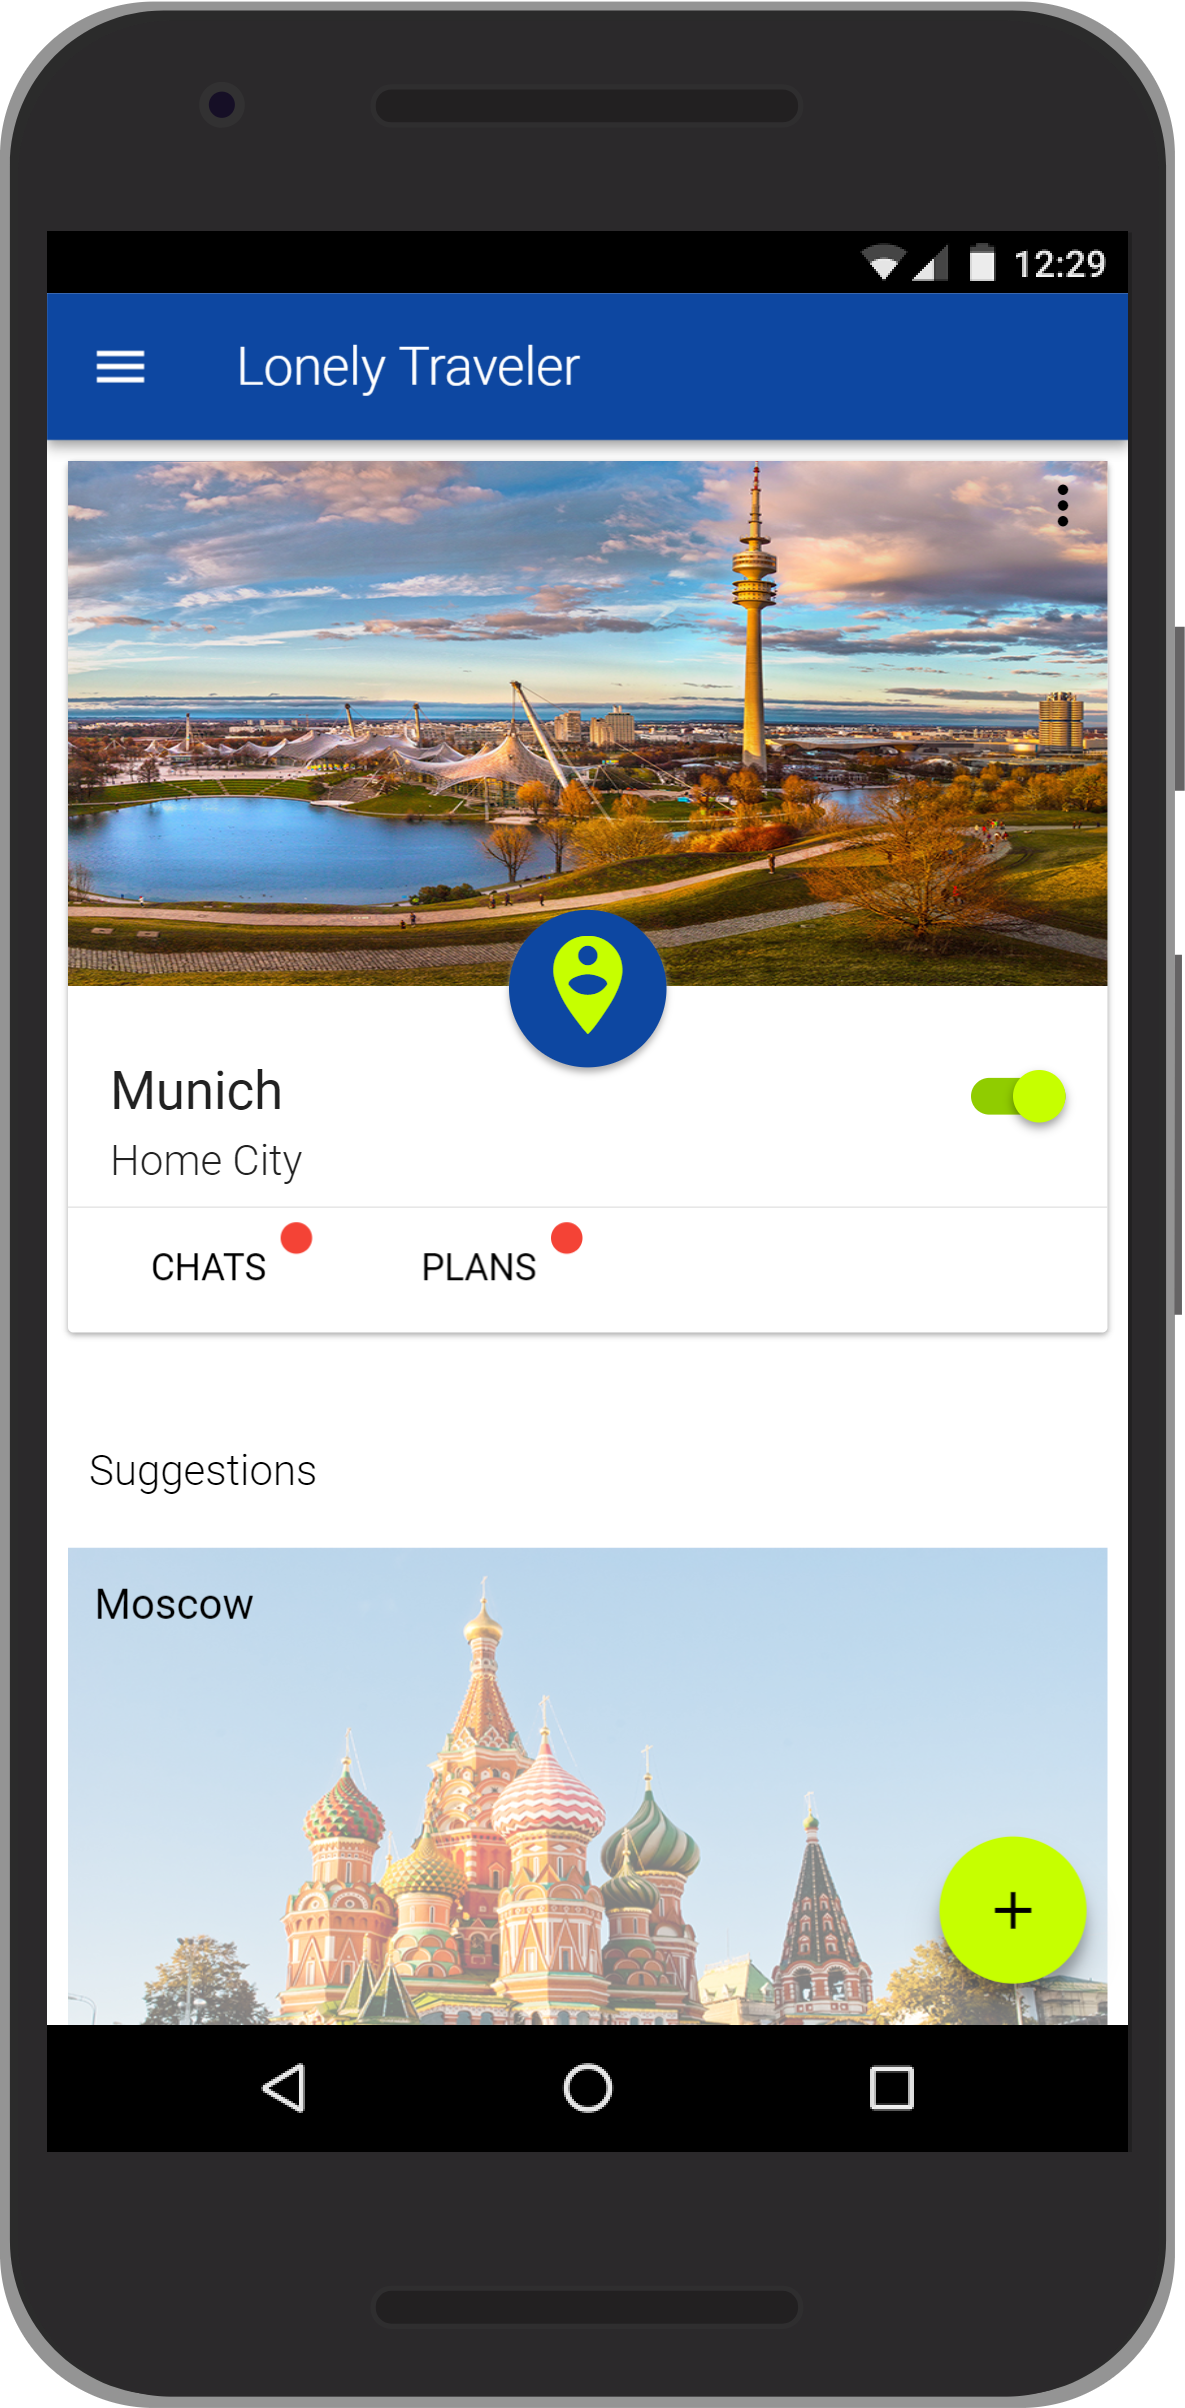
Google's Material Design
Design language developed by Google. Used on a wide variety of Android devices and in the web.
© HabbiApp, IPP WS16/17
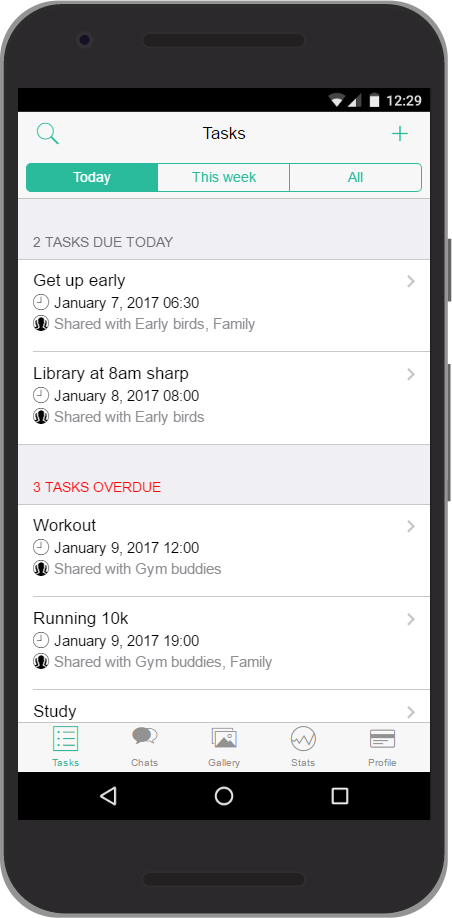
Apple's iOS Guidelines
Design language developed by Apple. Used mainly on iOS devices and on some websites.
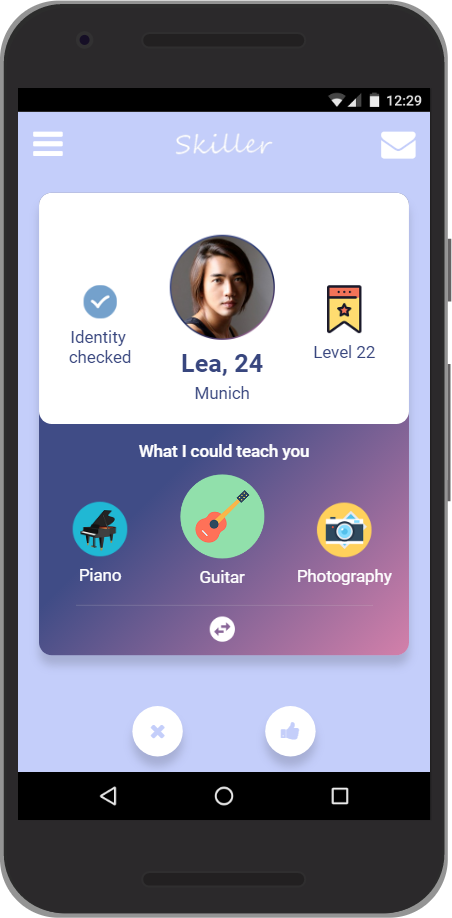
© Skillers, IPP WS16/17
Your Own Design Language
A design language carefully crafted by yourself and tailored to the specific needs of your app.
While we do not require you to use any framework at all, we strongly suggest you use one. Choice of framework is up to you, however a flexible candidate, that incorporates material design, iOS guidelines as well as customization options is Framework 7.
When choosing to follow a predefined design language, be precise and make sure to really follow it. Deviations from a chosen language have to be explained reasonably and the observance of your chosen style will be considered during grading.
Discuss your considerations and decisions with your programming tutor. Document your decision process and why you chose which design language on not more than one page in iteration-3/analysis in the GitHub master branch.
Design: Style your prototype
Using the design language from the previous task, redesign your paper prototype accordingly. The obtained results should have a high graphical fidelity and resemble the goal for your final design. These screens can best be designed using graphical software like
Document at least 3 example screens following the new style as images in iteration-3/design in the GitHub master branch.
Implementation: Transfer the prototype to a web app
Transfer the early stage prototype views to a prototypical lo-fi HTML/CSS/JS application. Focus on the prototypical views of your early stage prototype, add interaction for switching the views (not too much functionality yet). Ensure that you still apply the design (or usability) principles!
Add all views you need for matching your scenarios and requirements.
- Use CSS/JS frameworks as necessary
- Add style sheets and scripts as external files. Comment them!
Test the mobile usage of different application views
- By using the phone emulator in Google Chrome.
- On your smartphones using GitHub.io
Store your web app in a (public) folder v3 in the GitHub gh-pages branch.
Qualitative Evaluation
Conduct a qualitative evaluation of your prototype with 2-5 participants based on your user scenarios and test cases. Define criteria for your evaluation. Document/record the test in a suitable way (photos, log, etc.). For inspiration, read Chapter 7 ("Usability Assessment Methods beyound Testing") in Nielsen (1993), or Chapter 4 ("Evaluating Interface Designs") in Shneiderman (2014).
Write/draw a very brief evaluation report on 1 single page, summarizing the documented evaluation. Describe your evaluation approach in a schematic manner: include your test cases, participant pool, identified problems & suggestions, etc. as well as your interpretations.
Upload your evaluation report to a folder iteration-3/evaluation on the GitHub master branch.
Milestone Presentation III
You will present your approach and findings, and demonstate your app (15 min presentation + 5 min discussion) during the next Interaction Prototyping session. Prepare a short presentation on your approach based on the documentations/reports. Demonstrate the work in progress (i.e. your prototype) and formulate questions, you can discuss with the experts in the plenary.
Upload your presentation (.ppt or .pdf) to a folder iteration-3/presentationon the GitHub master branch. Bring your smartphone for the presentation (we'll connect it to a screen), ensure that your web app is available in the (public) folder v3 in the GitHub gh-pages branch.
Fourth Iteration
Analyse: Reflections and aiming forward
Analyse the results of Task 18: Qualitative Evaluation, work out positive points to keep working on and the negative points to be improved. Compare those Todos with the planned goal of your application, decide what are exactly to be impelmented/improved.
Design: Improvement and model the interaction
Transfer Coopers interaction framework. Apply your definitions (including patterns/guidelines) above to the web technologies HTML5/CSS3/JS:
- First, model the prototypical structure/hierarchy (in HTML), the data elements (as JS objects), the functional elements and input methods (e.g. HTML5 forms, jQuery UI components, ...).
- Second, model a rough prototypical sketch of key path scenarios (e.g. navigating the hierarchy) using jQuery.
- Third, design the visual appearance of your application in reusable and hierarchical CSS3 classes.
Implementation: Build your hi-fi HTML Prototype
This time, you'll seamlessly upgrade your HTML lo-fi model to a hi-fi HTML application:
- If possible, get information for the data elements dynamically, e.g. using APIs. A list of web APIs is available on ProgrammableWeb.
- Link the data elements to functional elements (i.e. make your application dynamic).
- Implement the interaction
- Implement the visual appearance to match your defined style (and the guidelines)
Finalize your prototype to be deliverable and testable.
Clean up your application code (HTML, CSS, JS) and check your comments concerning their understandability for the upcoming code review.
Important: Ensure that you address all the grading critera described in the "expectations, requirements and grading" section above.
Notice: It is strongly recommended that you comment your code and make your code as understandable as possible for our review. However, the usability and functionality of the application has a higher priority than the readability of your code. Remember, this is about an interactive prototype.
Store your web app in a (public) folder v4 in the GitHub gh-pages branch.
Experimental requirements: Hypotheses, test cases and metrics
Read chapter six ("Usability Testing") in Nielsen, J. (1993). Usability Engineering. Cambridge, Mass.: AP Professional. Retrieved from: http://proquest.tech.safaribooksonline.de/9780125184069.
Prepare requirements for a quantitative and summative evaluation.
Hypotheses
State goals and derive hypotheses that you want to test (e.g. "completing task x with the prototype is faster than with off-the-shelf software", "the prototype achives at least a rating of x", "the performance for fulfilling the task will be x %" etc.). The hypotheses should be in line with your functional and usability requirements. A good introduction on creating theories and deriving hypotheses is given in Field (2009).
You must be able to explain, why you chose a certain hypothesis (including any predefined values). The easiest way to do so is by referencing relevant literature.
Test cases
Derive the test cases (tasks), from your use cases. Subjects will need to fulfill the test cases in order to reject/prove your hypotheses (some hints on test scenarios are given on usability.gov).
Metrics
Nielsen's (2012) post on User Satisfaction vs. Performance Metrics and refer to "Performance Measurement" (Nielsen, 1993, chapter 6.7). Define objective measures (obtained by logging parameters) such as reaction time, time to perform a task, number of errors, number of interaction steps, etc. Additionally, define subjective measures. Design or use an existing short questionnaire that uses scales to analyze the product (a list of questionnaires can be found on usabilitynet.org, another list of usability and user eyperience surveys is available from unige.ch, further questionnaires can be found on measuringu.com).
Summarize hypotheses, test cases and metrics in a brief report in the folder iteration-4/preparation on the GitHub master branch.
Experimental design: Plan and prepare a quantitative (summative) evaluation
Please operationalize your hypothesis using the metrics. Define quantitative criteria for assessing your prototype subjectively and objectively.
Prepare the experimental setup for your summative evaluation.
Design the experimental procedure.
Setup the data acquisition (direct in-app logging, observation, record, ...).
Test the setup, procedure and data acquisition.
Upload a photo of the setup, as well as a brief listing of the quantitative criteria and the procedure to a folder iteration-4/preparation on the GitHub master branch.
Milestone Presentation IV
Prepare a short presentation (15 min presentation + 5 min discussion) on your approach, which includes the demostration of the final prototype and presentation of experiment design.
Bring the app, measuring equipment, questionnaires, etc. to the lecture. Be prepared to discuss your app and evaluation methods!
Important Deadline: After the presentation, you still have 7 days (until 21.01.20 at 23:59:59) to fine-tune and finalize your prototype based on the feedbacks. Afterwards, your GitHub repository will be freezed, and no change will be taken into the final evaluation. Tips: don't be demotivated by the imperfection of your prototype, it is still a prototype at this freezing point. For all team members, please move on and be consentrated on the final evaluation.
Final Evaluation
Evaluation
Evaluation: Data collection for the quantitative evaluation
Collect data from at least 10 persons depicting your target group (relatives, friends, fellow students, etc.). Store the acquired data in a suitable manner.
Upload the data set to a folder final_evaluation/data in the GitHub master branch.
Analysis: Statistical analysis of the quantitative evaluation
Please format your data for analysis in the statistical tool of your choice (Excel/JMP/R/SPSS). SPSS is available on computers located in the ergonomics department (LfE). To create an LfE account, required to use the LfE computers, contact the LfE Technical Support Team.
Perform a statistical analysis and reject or accept your hypothesis (a good overview on statistical analyses is given in Field, 2009). Make sure you check the assumptions of the tests before using them. Express the results in the best way for the audience of your final presentation (see below). Use APA6-style diagrams (or tables) for this purpose and interpret your results with regards to your hypotheses and functional as well as usability requirements. Include your results' implications for your design.
Upload the analysis in a folder final_evaluation/analysis in the GitHub master branch.
Final Presentation
Please prepare a presentation for the final presentation, which should include the whole methodological prototyping process that you used. Design the presentation for new stakeholders (i.e. usability experts, evaluators, professors, ...) that do not know your methodological process yet. Focus on the iterative user centered design process. It is important to motivate the evalation methods, the results, as well as design improvements. Provide both an overview (all the methodological steps) and some highlights (details on chosen techniques/tools, important results, well-chosen design improvements).
Your presentation should contain:
- motivations both for the application and the iterations (users, goals, requirements, ...)
- an overview of your process iterations (used methods, prototyping tools, evaluations, final application views)
- well chosen exemplary details regarding evaluation results and design improvements
- discussions/conclusions of the iterations
During the presentation (exactly 15 minutes!) you will give a short explanation of your overall work (10 minutes) and demonstrate the mobile application (5 minutes). Ensure that each group member presents. Be prepared to answer additional questions afterwards (approx. 5 minutes).
Important: Ensure that you address all the methodological grading critera described in the "expectations, requirements and grading" section above.
Creative Presentation designs and styles are highly encouraged. The only requirement are the TUM-Logo in the top right corner of the presentation as well as slide-numbers (for an easier discussion).
Apply the APA6 guidelines for formatting figures, tables, and statistics (a summarized styleguide can be found on the institute's website). But keep in mind, that you're going to present an iterative process, so you need to transform the common (APA6) structure ("introduction", "method", "results", "discussion", "conclusion"). Altogether, you need to combine the scientific and the iterative design process to present your methods and results.
Upload your presentation (.pdf) to a folder iteration-5/presentationon the GitHub master branch. Bring your smartphone for the presentation ensure that the latest version of your web app is available in the (public) folder v5in the GitHub gh-pages branch. It might be helpful to create backup slides with the documents/reports created during the analysis, design and evaluation phases as supplementary material for questions emerging during your presentation.